

Debugging is an essential aspect of the WordPress development journey, ensuring that your website functions seamlessly and delivers an optimal user experience. In the extensive world of WordPress web development, errors are unavoidable companions, often lurking beneath the surface and involving the WordPress site’s performance. Comprehending what debugging entails is the first step in developing a strong and error-free digital presence.
What is Debugging in WordPress?
Debugging in WordPress is the systematic procedure of recognizing and accessing error logs, and fixing errors within the codebase of a WordPress website. It plays a pivotal role in ensuring the smooth functionality of the site by uncovering and addressing errors that may hinder its performance.
Why is WordPress Debugging Important?
WordPress debugging holds major importance in the domain of web development, serving as the alert guardian against potentially some of the common WordPress errors that could compromise the functionality and performance of a website. It is the proactive technique that ensures a seamless digital experience for both developers and end-users alike.
- Supporting Scalability: Debugging contributes to the scalability of a WordPress site by addressing performance bottlenecks. As developers optimize the codebase, the website becomes more flexible to increased traffic and evolving business needs.
- Adhering to Industry Standards: Debugging ensures that a WordPress site adheres to industry standards and best practices. This not only enhances the site’s overall quality but also ensures compatibility with different devices, browsers, and emerging technologies.
- Facilitating Collaboration: Debugging is a collective effort that improves communication among development teams. By recognizing and fixing issues transparently, developers can operate more efficiently, share insights, and collectively contribute to improving the website.
- Minimizing Downtime: Debugging plays an important role in maintaining WordPress website uptime by recognizing and rectifying downtime issues swiftly. This guarantees that the site remains accessible and operational, lessening the impact on users and maintaining business continuity.
- Maintaining Reputation: A well-maintained and bug-free website is important for preserving a positive online reputation. Debugging prevents problems such as broken links or error messages, ensuring that visitors perceive the site as trustworthy and experienced.
Enabling Debugging in WordPress

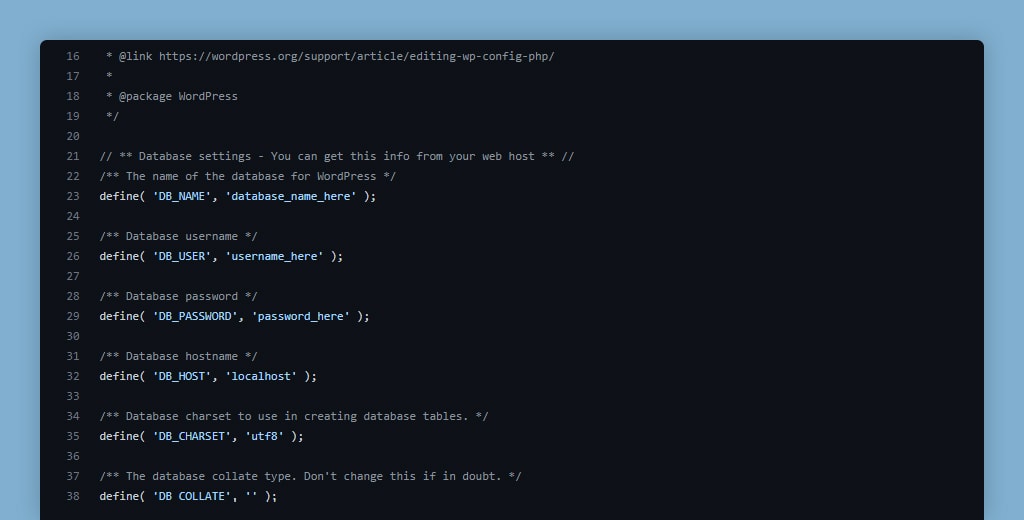
One of the first steps in debugging your WordPress website is to allow debugging. By default, debugging is turned off in WordPress, but you can efficiently turn it on by adding the following code to your wp-config.php file:
define('WP_DEBUG', true);This code tells WordPress to show errors and warnings on your website, which can help identify the source of a issue.
Setting up Error Logging in WordPress
In addition to displaying errors and alerts on your website, you can also log errors to a file. This can be helpful if you are unable to access your website due to an error. To set up error logging, you will require to add the following code to your wp-config.php file:
define('WP_DEBUG_LOG', true);This code implies WordPress to log errors to a file named debug.log, which can be located in the wp-content directory.
Debugging Tools

In addition to the built-in debugging features in WordPress, several tools can help you troubleshoot errors on your website. Some of the most famous tools include:
- Debug Bar: This plugin adds a debugging menu to the admin bar in WordPress. It delivers a quick method to access common debugging functions, such as the list of active plugins and the memory usage.
- Query Monitor: This plugin delivers detailed information about database questions, hooks, and more. It is an important tool for developers who need to comprehend what’s happening behind the scenes.
- Browser developer tools: Most current web browsers include developer tools that can be utilized for debugging. These tools are essential for front-end developers and can be used to examine and troubleshoot problems with the layout, styles, and JavaScript.
Troubleshooting Specific Errors
Now that you have an experience of the basics of debugging in WordPress, let’s take a look at how to troubleshoot some specific errors.
White Screen of Death (WSOD)
The white screen of death (WSOD) is one of the most frustrating errors that can occur on a WordPress website. It is often driven by a PHP error, but can also be caused by a plugin or theme contest. To troubleshoot a WSOD, you can try the following:
- Disable all plugins: If you suppose that a plugin is causing the WSOD, you can disable all plugins to see if the error goes away. To do this, you can rename the plugin folder in the wp-content directory, or utilize a plugin like WP-CLI to disable all plugins from the command line.
- Switch to a default theme: Similarly, if you suppose that a theme is driving the WSOD, you can switch to a default theme like Twenty Twenty to see if the error goes away.
- Check your error logs: If the WSOD is generated by a PHP error, it should be logged in your error logs. You can scan your server’s error logs or the debug.log file in the wp-content directory.
- Check for a memory limit issue: Sometimes, the WSOD can be driven by a lack of memory. You can improve the memory limit by adding the following code to your wp-config.php file:
define('WP_MEMORY_LIMIT', '256M');Internal Server Errors
Internal server errors are another common blunder that can occur on a WordPress website. They are usually caused by an issue with the server, but can also be caused by a plugin or theme conflict. To troubleshoot an internal server error, you can test the following:
- Check your error logs: Like the WSOD, internal server errors should be logged in your error logs. You can inspect your server’s error logs or the debug.log file in the wp-content directory.
- Check your .htaccess file: The .htaccess file controls many of the server settings for your website. If there is an issue with this file, it can cause an internal server error. You can test renaming the file to see if the error goes away.
- Check for a plugin or theme conflict: As with the WSOD, you can test disabling all plugins or switching to a default theme to see if the error goes away.
Syntax Errors
Syntax errors happen when there is an issue with the code on your website. They can be driven by a variety of things, such as a missing semicolon or a typo in a function name. To troubleshoot a syntax error, you can test the following:
- Check your error logs: Syntax errors should be logged in your error logs. You can inspect your server’s error logs or the debug.log file in the wp-content directory.
- Check for a plugin or theme conflict: As with the WSOD and internal server errors, you can test disabling all plugins or switching to a default theme to see if the error goes away.
- Check your code editor: Make sure that your code editor is assigned to show syntax errors, and review your code for any errors.
Common Plugin and Theme Conflicts
One of the most common reasons of errors on a WordPress website is a battle between a plugin or theme and the version of WordPress you are utilizing. To troubleshoot a plugin or theme conflict, you can test the following:
- Check the plugin or theme’s documentation: The plugin or theme’s developer should have knowledge of which versions of WordPress it is consistent with. If the plugin or theme is not compatible with the version of WordPress you are utilizing, you may need to discover an alternative.
- Update your plugins and themes: Make sure that you are utilizing the latest version of each plugin and theme on your website. Outdated plugins and themes can cause conflicts with the recent version of WordPress.
- Disable suspect plugins or themes: If you suppose that a particular plugin or theme is generating a conflict, you can disable it temporarily to see if the error goes away.
- Check for compatibility with other plugins or themes: Sometimes, conflicts can arise between different plugins or themes. Check the compatibility information delivered by the plugin or theme developer to see if they are known to work well together.
Optimizing and Cleaning Up Your Website
In addition to troubleshooting errors, it’s necessary to keep your website optimized to prevent issues from occurring in the first place. Some best practices for optimizing your website include:
- Keep your WordPress version, plugins, and themes up-to-date: This will guarantee that you have the latest security updates and features.
- Remove unnecessary plugins and themes: Every plugin and theme you have installed on your website raises the risk of a conflict or compatibility issue. Remove any plugins or themes that you are not operating.
- Optimize your images: Large photos can slow down your website. Optimize your images utilizing a tool such as TinyPNG to reduce the file size without losing quality.
- Minimize the use of external scripts: External scripts, such as social media widgets, can slow down your website. Minimize the use of external scripts, and think of using a caching plugin to enhance performance.
- Regularly check and clean up your website’s code: This will assist in ensuring that your website is running efficiently and prevent errors from happening in the future.
Conclusion
In the dynamic world of WordPress, useful debugging stands as a keynote for maintaining a strong and error-free website. As we complete our comprehensive guide on WordPress debugging, it becomes clear that troubleshooting and resolving problems play a pivotal role in ensuring a seamless user experience.

