Nowadays, online bookings have become an important part of our daily lives, do you know how? And why?
Since the COVID-19 layers gradually increase and impact the overall global environment, people prefer things to do online. The manual processes are almost coming to an end.
The online appointment booking system is no more saturated in the market because most people are planning to start an online booking business to leverage this online trend.
Do you know?
43% of patients prefer to book appointments online. (Kyruus, 2020).
This blog will help you understand the gravity forms booking plugin for your WordPress website and its documentation.
Some Researched Statistics
We have brought some of the useful statistics about online bookings that are listed below. Have a look.
- In 2026, the estimated value of the appointment software scheduling market estimated value will rise to $546.31 million.
- In 2024, the estimated value of the global appointment scheduling software market will rise to $360 million.
- The price range of appointment booking systems starts from $0 to $150 per month.
- On Monday and Wednesday, most of the online bookings are scheduled.
- If spas stop offering online bookings, then approximately 46% of bookings can be lost.
- In the COVID-19 pandemic, around 11.4 million appointments were canceled by the US Veterans Health Administration from February 1, 2020, to May 1, 2020.
- Around 1/3rd of patients schedule their dental appointments online.
- The most famous services for online booking are shown below in the screenshot.
Gravity Booking Plugin
Enhance your booking experience with the amazing gravity forms booking plugin that manages all types of online schedules and appointments with the integration of Google Calendar. Shed some light on the main features of a Gravity Booking plugin.
Features
- It is relatively easy to install and configure; even a non-technical person can do it without any hassle.
- An admin can easily customize the booking forms and give them a touch of their brand styling.
- You can easily fetch out the data by the extraction process in CSV and PDF file formats.
- Categorize your services so that it becomes for the customers to find out their desired service.
- Integrate different payment methods that enable you to accept payments securely and quickly.
- Showcase your appointments in two different ways, i.e., calendar or list view.
- It is device-friendly and can be easily accessed on mobile, laptop, tablet, and desktop screens.
- Make your own rules and add them to your listed services.
- The customers will receive notifications on accepting the appointments and bookings.
- Off days and other holidays can be marked to notify your customers and staff members.
- The multi-step forms can be created for the booking process.
- RTL (right-to-left) functionality is available for displaying different languages properly.
- Customers will be able to preview their forms live before any submission.
- Customers can easily add their appointments to their calendars for booking reminders.
- Customers can also sync their appointment calendars to their Google calendars.
Use Cases of Gravity Booking Plugin
Here you will find out the list of businesses using the gravity forms booking plugin to their WordPress websites to build appointment scheduling software.
- Law Consultants
- Doctors & Private Clinics
- Spa & Salon
- Tutors
- Therapists
- Dentists
- Restaurant Bookings
- Movies & Entertainment
- Gym & Sports
- Bus/Cab Booking
- Repair/Maintenance Centers
- Tickets Booking
How to Connect Gravity Booking plugin to your WordPress website
Nothing to worry about. Simply go to its official website and purchase one of its plans available on its website. There are two payment plans, annually and lifetime. You can opt for any of these plans as per your preference.
Once you purchase the plan, you will have access to download the archive file of the plugin package. Now, go to your WordPress website dashboard.
Next, go to Plugins → Add New. Click on the Upload button and pick the plugin’s archive file, then install it.
Configuration
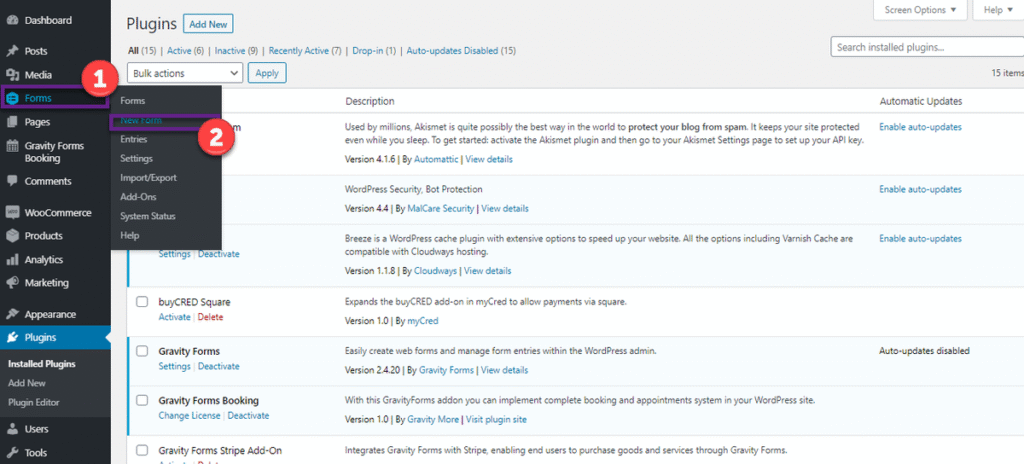
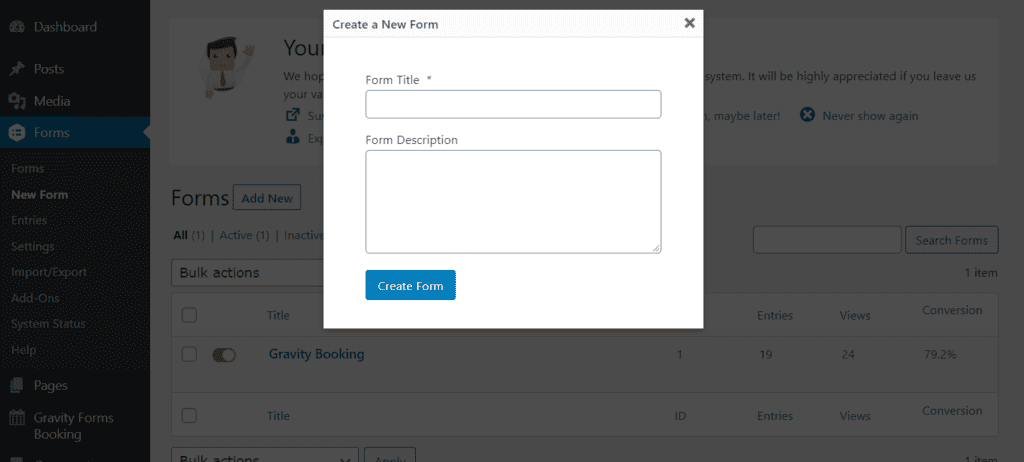
In your WordPress admin dashboard, go to Forms → New Form. A new window will appear and ask you for ‘Form Title’ and ‘Form Description’. Fill in both of these fields and click on Create Form button.


Your form will be created. Now, click on the ‘Advanced Fields’ option to expand available on the right-hand side of the form.
Drag the fields that you want to add to your form and drop them into your form window.

You will need to click on ‘Booking Fields’ available on the bottom-right side of the form for the booking fields. Once it is expanded, you can drag the booking fields and drag them into your form.

Next, give them labels, descriptions, and select the category. This is how you can create different forms.
Now, go to Forms → Settings and click on the ‘Gravity Forms Booking’ option available at the last of all the options.

Here, you can add the short names for all the days displayed in your forms.
Let us list out all other functionalities and uses of this gravity forms booking plugin. Explore all of them for a better understanding.
- On a dashboard, you can check transactions you have made, offered services, number of staff available in your business, income per day, and a lot more. A screenshot is attached below for more idea

- Check out your calendar by clicking on the Gravity Forms Bookings → Calendar. Here you can see all your bookings.
- To check your appointment status, go to the ‘Gravity Form Bookings → Appointments. All statuses are visible here, such as visit, canceled, confirm, and delete.
To explore more about it, you can check out their detailed documentation by clicking here.
Wrapping Up
There is much more to wrap up in this blog, but we have demonstrated the important parts that you must know about this gravity forms booking plugins. This blog will help you if you get stuck somewhere in this plugin’s installation and configuration process.
For further information, you can hop on to their official website and check out their comprehensive procedure.
